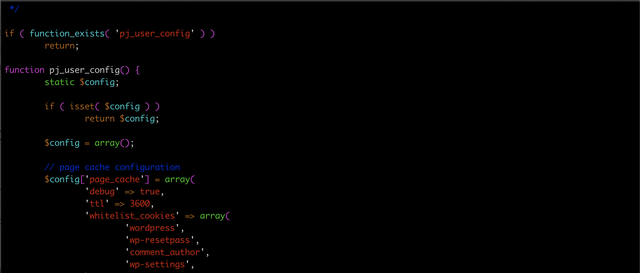
We use our own Redis-backed cache plugin for all bucket filter configuration examples in this article, but most popular page caching plugins will have something similar in their UIs. Caching should be the last thing you do, after your application code has been optimized. We advocate this all the time.
Cache Primer
Full page caching works by capturing WordPress-generated output, storing it somewhere, and then sending it from storage without booting up WordPress. Cached requests usually take up a couple of milliseconds of processing time, in comparison to hundreds or thousands of milliseconds without caching.
Cache Buckets
The most aggressive cache configuration will take a URL and throw it into one storage. This can result in cache poisoning. Since your WordPress application has dynamic output, data and behavior meant for one user should not be sent to another on the same URL. Reading an article – sure, no harm in that. Looking at account details – bad idea.
This is where bucketing comes into play. Most cache plugins are not configured to cache aggressively. They will differentiate not only by the request URL, but also by cookie values, request parameters. This is usually the default and a secure option. Some caching plugins for WordPress will have mobile detection, so that they don’t serve cached HTML meant for desktop browsers to mobile devices.
This differentiation results in many different buckets being created for one request URL. A contact page may have a bucket for mobile devices, for a certain logged in user, for someone who accepted the EU cookie notice, someone who is being tracked from Facebook or a Google search. If you visitors are being assigned unique cache buckets then you’re in trouble, your cache hit rate will be very low, since stored caches from one bucket won’t be shared with others.
Cache Bucket Configuration
Configuring your page caching plugin is very important. While the defaults are fine, you may find that your hit rates are very low. Our cache plugin has a great debug mode that can be enabled that will show you the different buckets for identical request URLs. If your plugin does not provide this simply checking your web request logs and site cookies issues to new visitors should help you determine the potential offenders.
Request URI parameters are usually left unfiltered. Some parameters should be filtered out, others should remain. For example if you’re not using pretty permalinks you’ll have to make sure that p, pagename, page and other WordPress GET parameters are sent to different buckets. Same with affiliate parameters, probably. Parameters like fbclid, utm_source and _cf, on the other hand, should probably be ignored as they are mere tracking tags that your analytics scripts and Facebook pixels will grab.

Cookies are another big one. CloudFlare proxies add unique cookies, PHP sessions for your sales funnel plugins do so too. WordPress login cookies should be bucketed, though. You don’t want users to share accounts, do you? 🙂
Simply checking the issues cookies and stripping them, or allowing them (see next section) will prevent unique tracking bucketing and improve your cache hit rates. You do need to be careful. Some tracking cookies (some MailChimp plugins and configurations) will require cookie values to be read on the backend, otherwise they will not register in backend reports, for example.
A good rule of thumb is to search the plugin code (grep -rni mailchimp_ for example) responsible for the cookies or request parameters. If they are not being used by in PHP, but are being used in JavaScript that’s fine. Such cookies and request parameters can be safely ignored and their target buckets not affected.
Ignoring POST requests is almost always exclusively advised.
Whitelisting vs. Blacklisting
There are two cache bucket configuration strategies.
Blacklisting involves stripping known keys from affecting target buckets and splitting. In our plugin this is done via the ignore_cookies and ignore_request_keys configuration parameters. By default anything starting with an underscore _ should probably be ignored, utm and fb can also be ignored, if you’re doing source tracking and Facebook marketing.
The drawback to this method is that you can’t predict future request parameter and cookie names. Neither can you predict bad actors. If you install a new plugin or signup with some new marketing platform they can send you traffic with unfiltered cookies. Some denial-of-service tools will send random cookie headers and request parameters to bypass caches. Bad.
Whitelisting involves filtering everything except some defined keys. whitelist_cookies can be used to allow only the needed cookies through. wordpress_ is one cookie you should be allowing into the backend, otherwise you’ll break login functionality. There is no whitelist parameter in our plugin as it’s very hard to gather a reliable whitelist. Plugins have all sorts of needs for URL parameters so the chances of something critical breaking are much higher than with cookies.
Overall if you tend to experiment a lot – use blacklisting. If you know what you’re doing and your setup is complete – use whitelisting.
Monitoring
It is important to gather, monitor and analyze your request data. Keep an eye on your cache hit rates and improve them to decrease your server load and requirements.
If you’re a Pressjitsu customer you can monitor your current hit rates in your application dashboard. You can further request historical cache data to see how it changed over time. If you need help configuring your cache parameters, please contact support. If you’re not a Pressjitsu customer fear not.
Keep your buckets to a minimum and your site healthy 🙂
Перевод: https://pressjitsu.com/blog/cache-buckets-filter-strategies/