If you’re reading about load testing a WordPress site, you’re probably worried about your website and you want it to be available to your visitors at all times.
Well, worry no more:
In this guide, we’ll delve deep into load testing your WordPress site and we’ll see how you and your site can benefit from it.
Essentially, load testing – also called stress testing – means checking how well your site performs under pressure by simulating high traffic. It can help you find out where you can make improvements to ensure that your website is highly available.
If your website doesn’t have a high uptime rate, then your efforts to generate more traffic are sadly a waste of time. Your website’s reputation and credibility will begin to fade, which will hurt your business.
But we’re here to help:
In this post, we’ll show you how to load test WordPress to ensure your site is ready to handle high traffic while maintaining premium performance.
WordPress Load Testing: What Is It?
Load testing is a procedure that you perform in a controlled environment and it involves simulating traffic on a target website.
More precisely, a load test mimics the traffic spikes you would expect to occur naturally so you can see if your site is ready to handle them. You monitor the website throughout the process to see how it responds to changes in the number of simulated visitors.
But the purpose of performing a load test isn’t only to see how much traffic your website can handle:
It also helps you test the limits of your server resources and predict the cost of growing your site.
Moreover, it helps you identify other bottlenecks that can cause issues with your website’s performance.
A great load test will cover a website’s loading speed, network usage, disk usage, RAM usage, bandwidth usage, and CPU usage.
But here’s the thing:
Although all these aspects matter, it’s likely that you won’t be able to measure all of them. Not every hosting company allows users to install load testing tools on their server to get access to this data – especially shared hosting providers.
So, for the purposes of our post, we’ll look at more general and accessible factors that should be considered when load testing your WordPress site for performance:
- Caching,
- Plugins, and
- Cookies.
However, you should keep in mind:
When it comes to WordPress, the core itself is quite powerful, but it’s also not without its flaws. It depends heavily on your stack, i.e. the web server, database, cache, and other software you use to run the site. So it’s essential to ensure all plugins and themes you use are well-coded and lightweight.
Next, let’s see what you need for load testing WordPress.
Requirements for Load Testing
To perform a load test, you need two things:
- A clone of your production website running on an identical stack
- A load testing tool for WordPress
In theory, you could perform a load test on your production site, but the whole purpose of this operation is to push the website to its limits and even break it. This is definitely not something you want to do with a website that your users should be able to access.
If you’re using a premium managed WordPress hosting platform, you probably have a one-click site cloning feature, so cloning a website should not be complicated.
It’s important to note that most hosting companies do not allow you to synthetically load a website hosted on their platform, as load tests affect other websites on the same shared server. Usually, this is only possible if you have a dedicated server, but this is not always the case.
Be sure to check with your hosting provider before running load tests on your WordPress site.
If you manage your WordPress site on a self-hosted server, you must manually copy your site and link the staging site to a custom domain or subdomain to make it accessible with the testing tool.
However, most load testing tools allow you to test by IP address and host header, so you may not need to buy a domain.
It is important that the clone is in an isolated environment so that the traffic at the production site does not interfere with your load test so the tests don’t risk crashing the production server.
Keep in mind that some providers such as cloud hosts and AWS require written permission before testing their infrastructure. The process is very straightforward and usually requires only a quick email or ticket.
However, this isn’t the case if your website is hosted by Pressjitsu.
For the purposes of this article, we’ll use Loader.io because it’s great with a free account, it’s cloud-based, and it’s user-friendly.
Of course, any load testing tool can do the job, and there are several great options to choose from:
- jMeter
- Apache Bench
- Siege
- K6.io (formerly Load Impact)
- Loader.io
- Loadfocus.com
- Loadview-Testing.com
You can choose the one that you think suits your needs the best.
How to Load Test a WordPress Site
After you clone your site, the next step is usually to verify that you own the website you’re about to load test by uploading a file via FTP or adding a DNS record.
This is necessary because you can only load test a site you own:
As a stress test pushes the server’s limits, the target site could become unavailable. This means anyone with malicious intent could crash any website with a load testing tool.
In this post, we’ll stress test three WordPress demo sites to cover different scenarios, plugin combinations, and caching configurations:
- Simple lightweight blog
- Complex membership site
- eCommerce site
All three sites will be running on one small AWS virtual private server that has 1 GB of RAM and 1 vCPU with the following stack:
- Ubuntu 18.04 LTS operating system
- NGINX web server
- MariaDB database
Once we complete the initial stress testing, we’ll add two caching layers: NGINX page caching and Redis object caching. Then, we’ll complete the second round of load tests.
But please note:
It’s crucial to first perform load tests without caching to understand the limits of your server. Later you can add any desired caching layers.
Before You Start the Testing
Before you start load testing your WordPress site, it’s important to develop a strategy.
First, decide which page you’re going to stress test.
Usually, you should test either your home page or another page where you expect your traffic to land. If needed, you can also spread the traffic over several pages.
Then, check the analytics for the pages you’re going to test.
After you have reviewed the data, consider how much traffic your site is already receiving and how much traffic can be expected if the trends continue.
This will help you figure out how much traffic you should simulate on your website during the load testing. Then, after you get the results, you’ll know how exactly and up to what level you should optimize your website.
1. Load Testing a Simple Lightweight Blog
The first website has a simple configuration, similar to a typical blog on the web, with the Twenty Twenty theme installed.
Here’s the list of installed and activated plugins for this site:
For the first test, 1,000 requests, or simulated users, were sent to the site over a period of one minute. Although this may look like a large number, it means on average 15-20 simultaneous visitors, which is realistic for many websites.
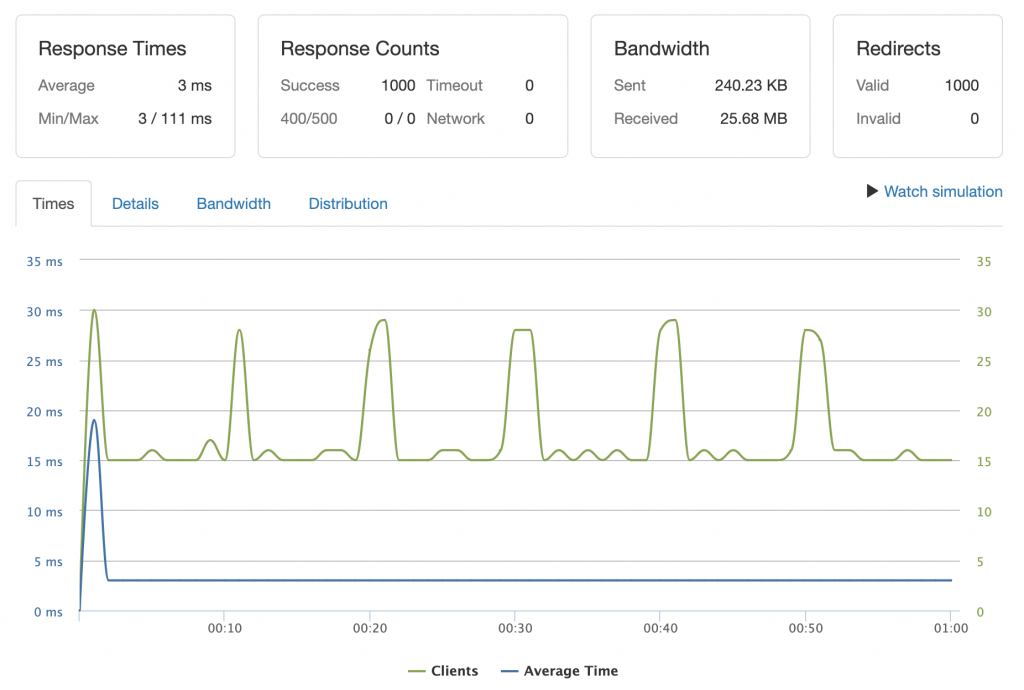
To interpret the results, we can look at the section Response Counts. There we find four metrics:
- Success – the number of requests successfully handled by the server.
- 400/500 – the number of unsuccessful requests where a 4xx/5xx response code is returned. Loader.io doesn’t specify which error occurred exactly.
- Timeout – the number of unsuccessful requests where the system doesn’t receive any data back from the server. This usually means the server is reacting slowly due to being overwhelmed by the requests.
- Network – the number of unsuccessful requests with network-related errors (connection failure, DNS not resolving, etc.).
The results of our first test were great, with 1,000 successful responses and no errors. This means our site is more than ready to handle this number of visitors.
However, take a closer look at the response time, which is represented by the blue line:
You can see that the website responds almost too quickly after the first request.
This is because we have full-page caching in place. So, the web server serves the page as static HTML content, and the PHP code is not executed after the first response.
All this explains the perfect response and excellent performance and also tells us that our caching system works well.
However, this also means that we have to test an uncached scenario and see how it behaves.
Even if you don’t have dynamic content on your site and you’re certain that you can cache everything, you should still load test your site with caching disabled.
Here’s the thing:
You may expect traffic coming from social media that has attached query parameters (e.g. Facebook adds the fbclid parameter to links).
And pages with attached query string parameters are served uncached by default. So, we’ll run the same test again with the same configuration on Loader.io.
But this time, we’ll add a query string parameter that we know will cause our web server to process each request bypassing the cache (e.g. https://website.com/?fbclid=test), which is a common default cache behavior unless explicitly altered (by ignoring query string).
The results are completely different:
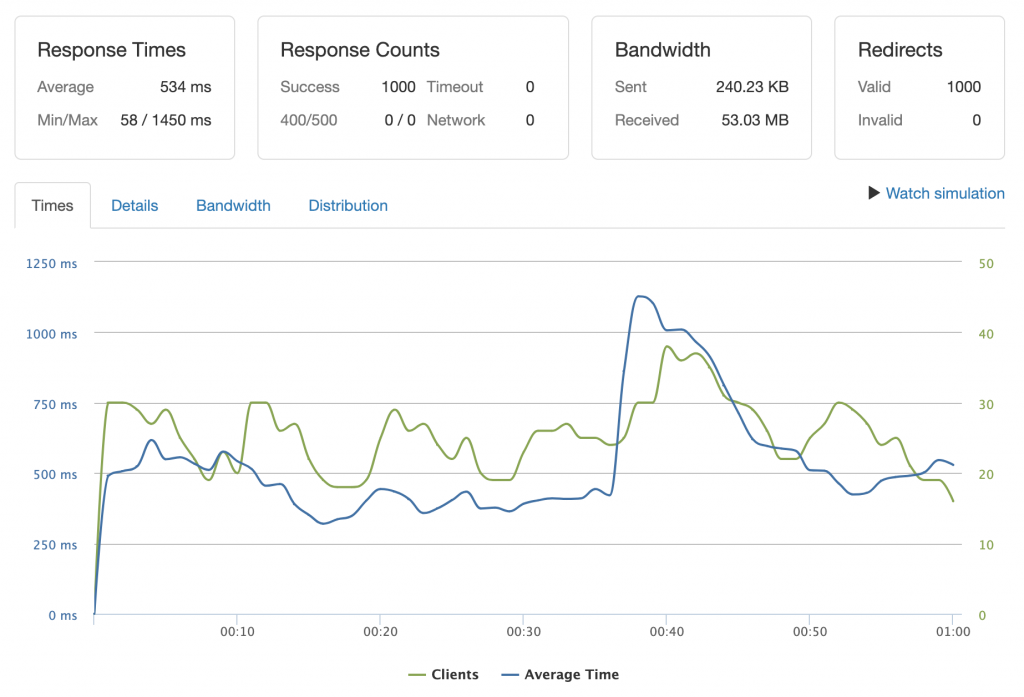
We still get 100% of successful responses, but:
- server performance becomes unpredictable,
- the website’s loading time is much higher, and
- the server may crash if we keep simulating traffic.
So, this is where we get to our first takeaway:
Takeaway #1: Proper caching makes all the difference in a site’s performance. But sometimes, the default cache configuration isn’t good enough. Think about how much traffic can be predicted for your site and configure caching to work well on that level.
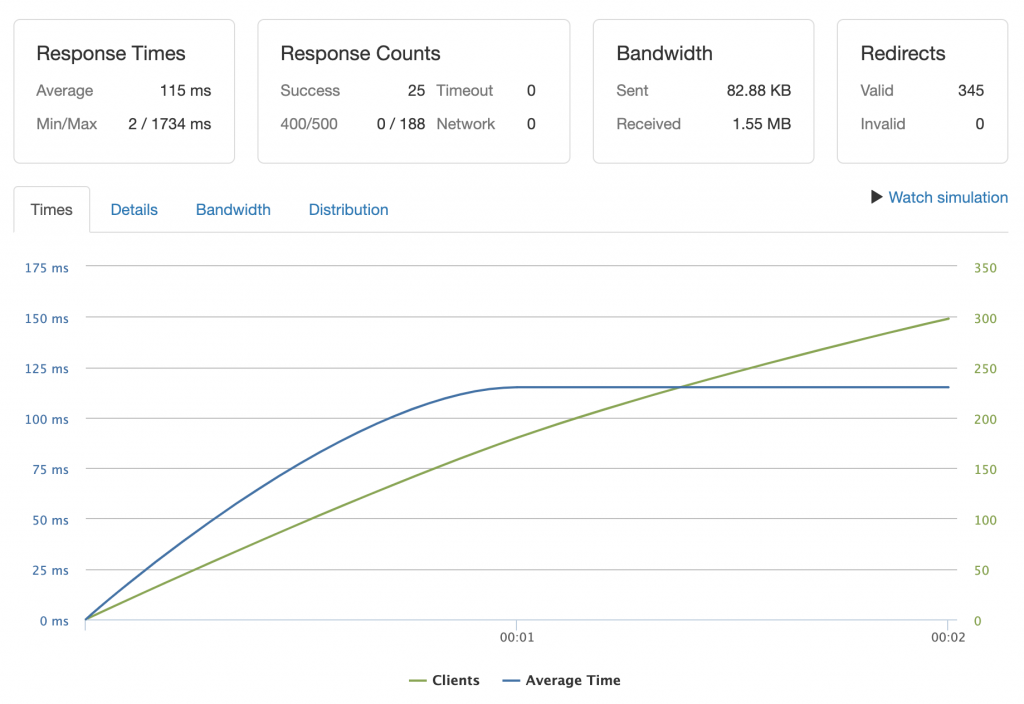
Now, let’s run the same test again, but this time with a higher number of clients – 10,000. Below, you can see how the website crashes almost immediately due to server errors. In fact, the test is stopped because we reached the error threshold, as almost all the requests fail:
But if we re-enable the cache and keep the number of clients at 10,000, the server handles everything smoothly:
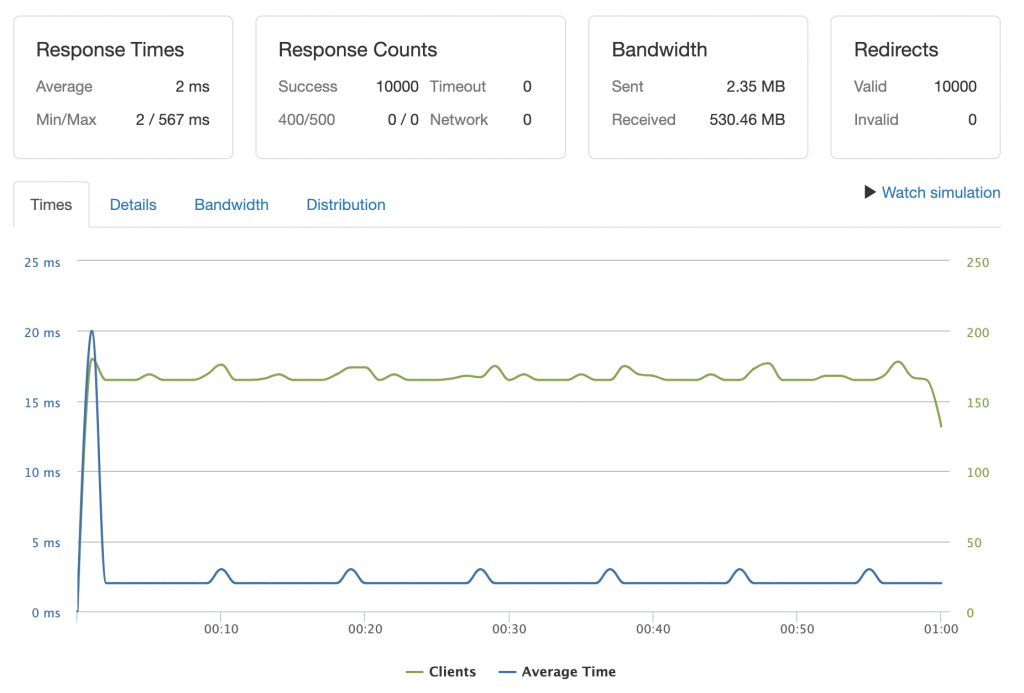
This demonstrates how important caching is for a WordPress website. So, it’s time to test another aspect: the number of installed and active plugins.
This brings us to the second test configuration:
2. Load Testing a Complex Membership Site
On this new website, we have used the OceanWP theme which is well known for great performance. We also used the Elementor page builder’s free version with a significantly higher number of installed plugins than the first example site above:
- Yoast SEO
- WP Forms
- JetPack
- Akismet
- WooCommerce
- Ultimate Member
- Sucuri Security
- Social Media Share Buttons
- NextGEN Gallery
- Newsletter
- Google Analytics for WordPress
- Cookie Notice
- Yet Another Related Posts Plugin
Although the list can look long, we are still being rather conservative here. We have 12 active plugins while it’s not uncommon to find sites with 30, 50, or even 90 plugins.
Now that the second site has been set up, we can continue. We’ll carry out the same load test that we performed on the first website, with 1,000 clients in a cached environment.
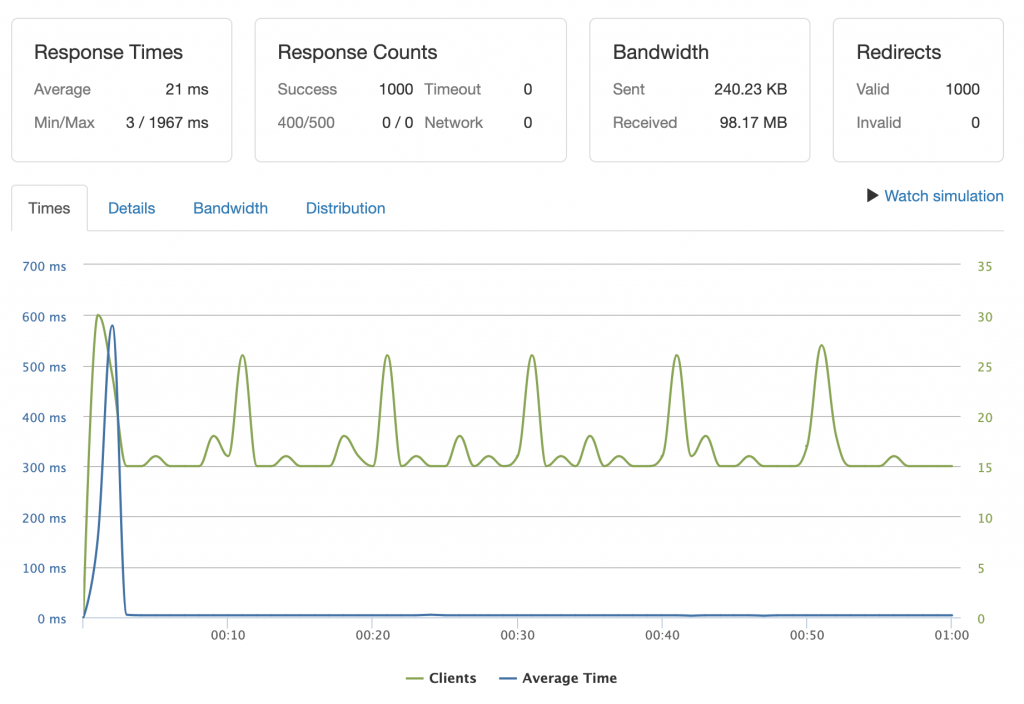
As we can see from the graph, the result is almost the same as the cached configuration test. But with one big difference:
The maximum response time is much higher – almost two seconds.
If we run the second test configuration again but in an uncached environment, we reach the server’s limits already with 1,000 clients. After 24 seconds, the Loader.io app stops the test because of too many errors:
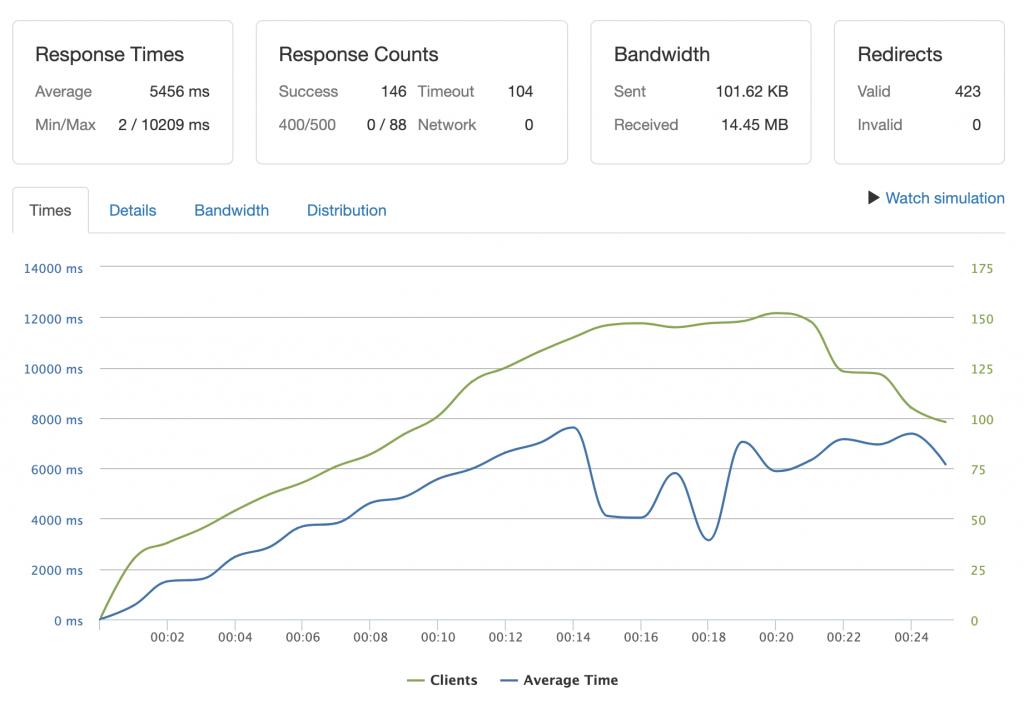
Now, we have the same server, the same stack, and different plugins. And we get a completely different experience.
There’s a very important takeaway here:
Takeaway #2: In WordPress, plugins bring us features but possibly at a cost in performance. Think twice before you install a plugin and check if you really need all its features or only some of them. Keep in mind that developing your own plugins and features can sometimes be more efficient. And you should always run tests with single requests before load testing your site with hundreds and thousands of requests.
With the second site configuration, I decided to identify the server’s limits more precisely, so I performed the load test with 750 and 500 clients.
Stress testing with 750 clients I still got too many errors.
But with 500 clients over a period of one minute, the server was able to handle the traffic:
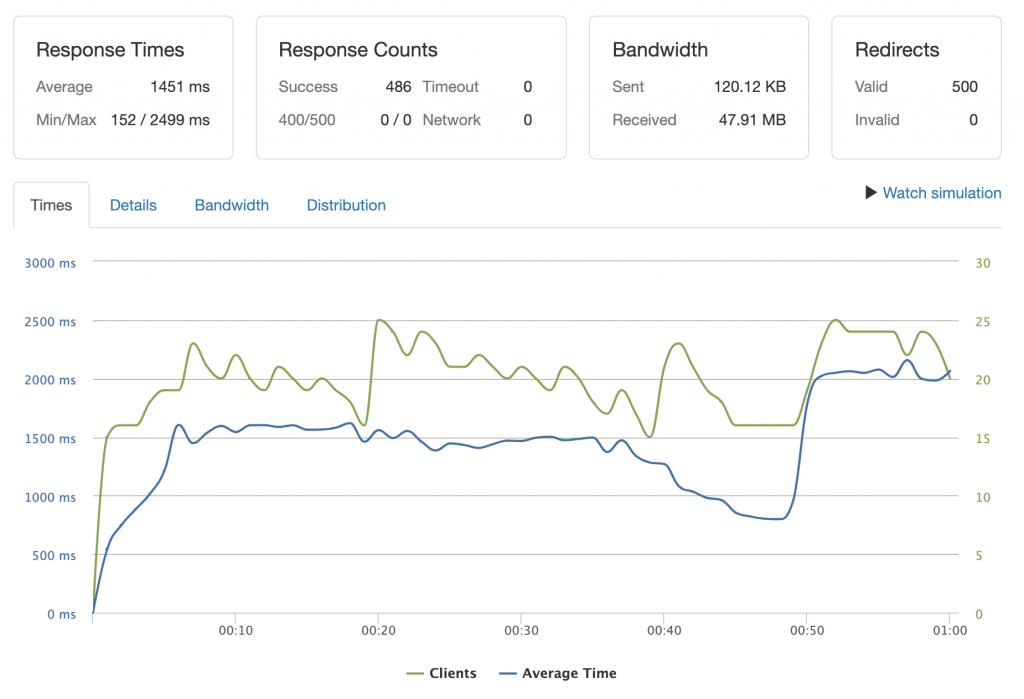
And for this particular example, it’s very important to test the uncached version. In fact, since it’s a membership site, we can assume a good portion of the traffic will come from authenticated users. And, of course, they will see uncached content because the content will be different for each user.
Now:
There are cache plugins that allow for a user-specific cache.
But they are not as powerful as a full static cache. Each user will have different cache buckets, so more requests have to be processed by the server itself.
Membership sites, however, aren’t the only type of website that needs to handle a good amount of uncached traffic.
Another example is eCommerce, which we load tested in our third and last configuration.
3. Load Testing an eCommerce Site
We have set put a pretty light eCommerce site with the Storefront theme, WooCommerce, and 500 products available in the store. There are a few extensions installed, enough to run a simple eCommerce store:
This time, let’s first stress test the uncached site.
The reason an eCommerce site must be ready for uncached traffic is that some of its pages, like cart sessions and checkout pages, can’t be cached. By default, the server will serve the pages of the eCommerce site either cached or uncached based on the visitor’s session. This, in turn, is defined by browser cookies.
However, in an optimal cache configuration, we need to ensure that we cache the parts of the site that we can, such as archives and product pages.
Here’s how the load test goes with 1,000 clients:
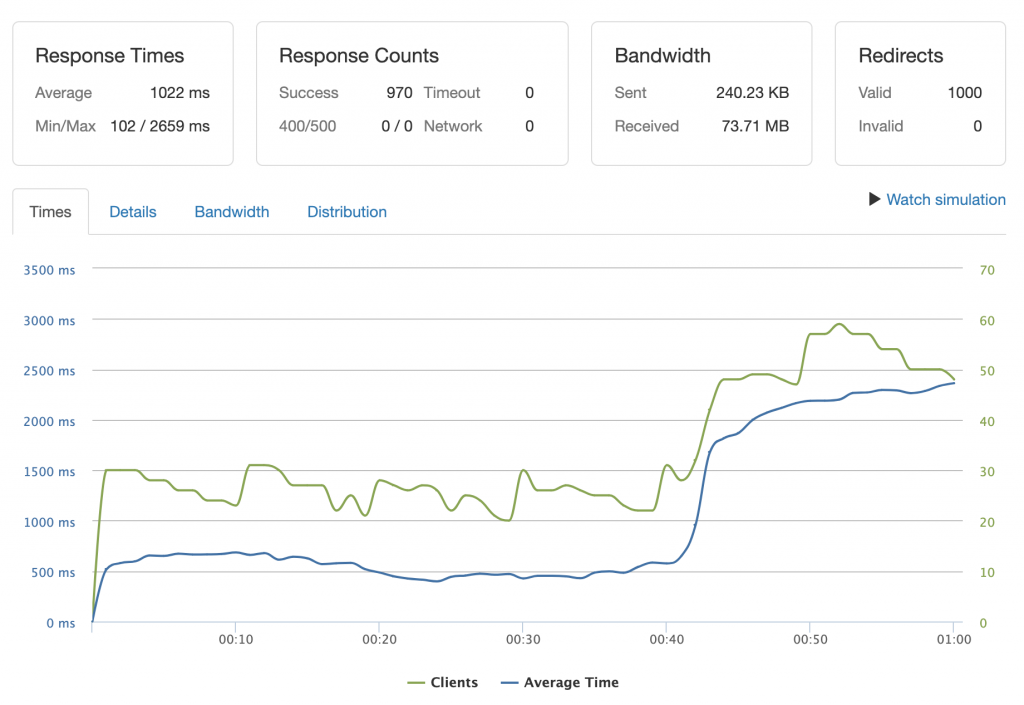
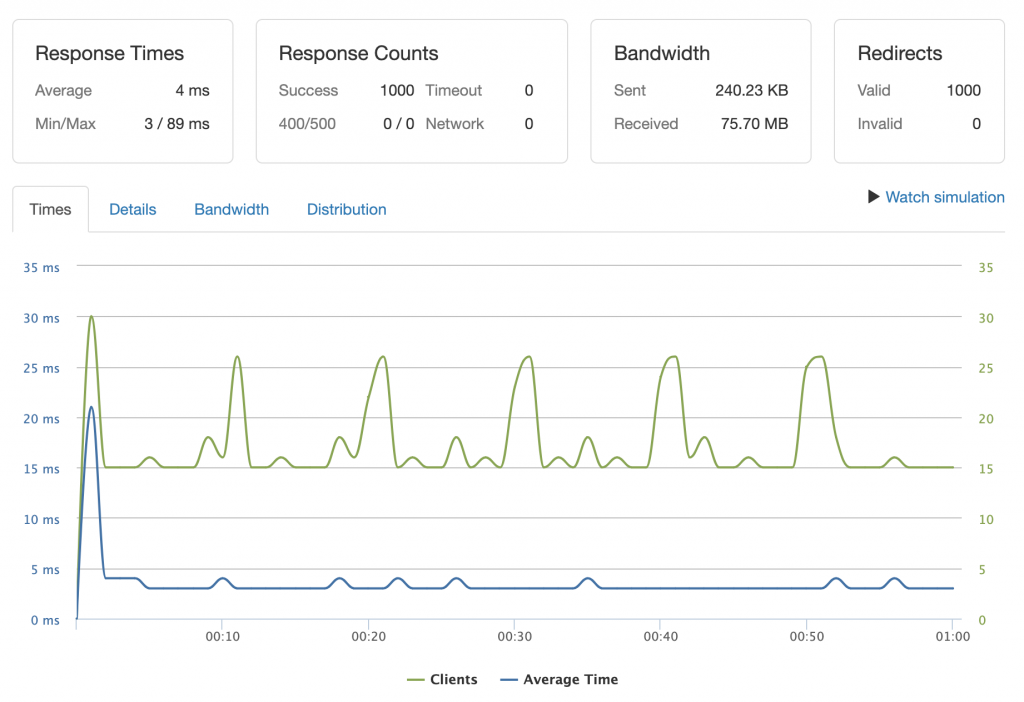
As you can see, we get a 100% success rate for an uncached test. This proves that an eCommerce site can also perform well if properly built, using a lightweight theme, a minimum amount of plugins, and well-written custom code needed for any specific functionality.
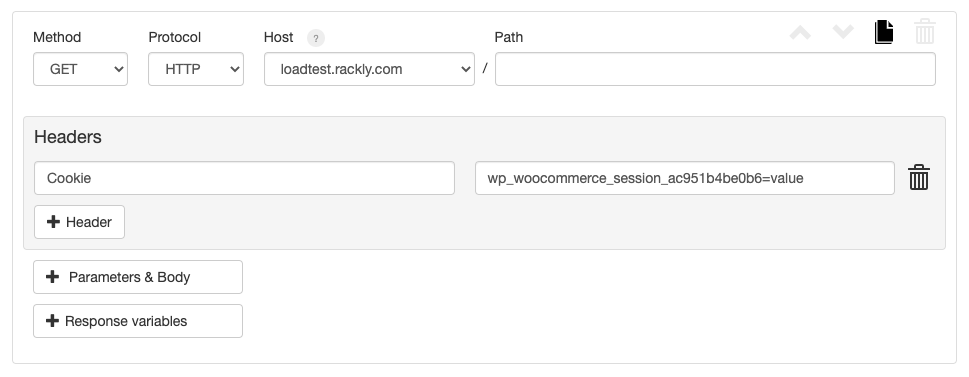
Takeaway #3: when load testing eCommerce sites, the cache can be suppressed “by cookie”. So, you should add cookies to your load test request configuration, having your server to send a “Set-Cookie” response. Or, you can manually add a “Cookie” header and its value (wp_woocommerce_session_*=value in case of WooCommerce sessions).
When testing a cached version of the site, we get a result similar to the usual results:
This raises the question:
Does a cached website have a limit?
The answer is, of course, yes. But this limit is usually quite high, especially on NGINX web servers, which handle concurrency and static content really well.
Identifying Common WordPress bottlenecks
We have put various types of websites through a stress test, but of course, there’s more to discover in each case. What we can recommend when load testing your WordPress site, is to start with an exact clone of your live site to get an initial picture.
Then, after the first test, you can play around and:
- Try disabling plugins one by one to identify slow plugins or bad combinations.
- Test individual pages of your website, especially those with high traffic potential.
- Try adding query strings to tests if you expect a lot of referral traffic.
- Try to switch the theme if you suspect that this could be a bottleneck.
Then compare the different results and take the required measures to improve performance.
How to Improve Your Visitor Capacity
If you hit the server’s limit and notice that it’s lower than the traffic you expect or desire, the first thing to do is to optimize your site.
This can include:
- Setting up a Content Delivery Network (CDN), if not already in place
- Fine-tuning the caching system
- Optimizing database queries
- Optimizing images
- Compressing and concatenating static assets
- Detecting and resolving any code bottlenecks
So, what to do if you’re sure that your site is completely optimized, but you still feel like you need more capacity?
If that’s the case then you can scale up by moving to a more powerful hosting plan. Or if you’re self-hosted, you can improve your server’s hardware.
But here’s perhaps the best way to improve your website’s capacity:
Migrate to a high-availability hosting provider, making your site available on more than one server.
A high-availability hosting service would improve your website’s performance and therefore also your visitors’ user experience. This is because, in such a multi-server environment, there’s usually a load balancer located in front of a pool of servers. The load balancer constantly checks the status of the server and routes traffic through all available servers to maximize the website’s speed and availability.
In addition to improving performance and user experience, such a design makes it easier to scale your website by adding more servers to the server pool.
Conclusion
High website traffic is usually a great thing. It can be the result of a successful marketing campaign, high rankings on major search engine results, or your content performing well on social media.
Wherever the traffic comes from, it’s important to be ready for it. If your site can’t handle it, you’ll waste the opportunity to convert those visitors into paying customers.
We have seen how load testing can help us become aware of our site’s limits in advance, and take the necessary measures to scale up. So, we do recommend to perform load tests regularly, as WordPress is an ever-evolving world due to its frequent updates. As does WordPress, so may the testing results also change over time.
Pressjitsu is a premium managed WordPress hosting service that really cares for you and your sites’ performance. Performance is one of our top priorities, so if you sign up with an annual plan, you’ll get a free 8-hour site optimization for your site, done by one of our expert WordPress developers.
We really hope that you’ll be part of Pressjitsu’s journey into the future, to beyond what we are today. We invite you to join us, either by trying us out or by following us on Twitter. You can also keep an eye on our blog to keep yourself up to date with our latest developments and recommendations for optimizing WordPress.
Перевод: https://pressjitsu.com/blog/load-test-wordpress-performance/