
We can probably all agree that the security of your website should always be a top priority when building your online presence. And one of the most important ways to secure your WordPress site traffic is to install an SSL certificate.
In this guide we dive deep into exactly that:
We’ll see why SSL certificates are important, how you can get one and how you can set it up for your WordPress site.
Fortunately, it’s not that difficult to take measures to protect the data of your website visitors and yourself.
Read our simple step-by-step tutorial to learn how you can prevent your website from falling victim to one of the more than 2,000 cyber-attacks that occur daily.
Table of Contents:
- What Is an SSL Certificate?
- Why Is an SSL Certificate Important for Your WordPress site?
- How Do I Get an SSL Certificate?
- How Do I Install an SSL Certificate On My WordPress Website?
- Before You Begin the Installation
- Buying an SSL Certificate From a Certificate Authority
- Installing a CA-Issued Certificate
- Redirecting Your Traffic On the Web Server
- Generating a Self-Signed Certificate
- Installing a Self-Signed Certificate with Apache and NGINX
- Generating a Let’s Encrypt Certificate
- Automating SSL Installation for WordPress
- Implementing SSL On a WordPress Site Doesn’t Have To Be Difficult
- Conclusion
What Is an SSL Certificate?
SSL stands for Secure Sockets Layer, which was the original security protocol for the web, which was developed as early as 1995. In January 1999 its replacement, Transport Layer Security, or TLS was developed. In June 2015, SSL became obsolete and all certificates generated since then use TLS security.
At that time, however, the term SSL certificate was so common in the web industry that it’s still used today. In this article, we’ll therefore use the term SSL instead of TLS.
Some people also refer to SSL as HTTPS, as this is how an SSL/TLS secure website address appears in your browser. In fact, the prefix https:// shows that the domain you’re visiting is secured with an SSL certificate. By default, servers send regular web traffic via port 80 and SSL-secured traffic via port 443.

But what exactly is an SSL certificate?
An SSL certificate is a small digital file that resides on a web server. And it has two important functions.
Firstly, it serves as a form of authentication and validation of the web server content.
Secondly, and more importantly, it provides a layer of security for the data transferred to and from a web server.
It’s actually quite simple:
You could think of an SSL certificate as a padlock on a locker.
If you want to open the locker, either to put something in or to see what’s already inside, you need the right key to unlock the padlock.
When data is sent back and forth between your browser and a web server, the SSL certificate “unlocks” the data on the website in the same way. And it also ensures that the data is transferred securely.
However, an SSL certificate contains a few more things than just a key.
An SSL certificate actually consists of many files that contain information about expiration dates, domains, the Certificate Authority, the owner of the website, etc. However, the two most important files – also called keys – are the public and private keys. These are used to verify and ensure the security of the data transferred.
Since each SSL certificate is issued for a specific web server and domain name (the website address), these files help ensure that a certificate isn’t used anywhere else.
Today, however, an SSL certificate is recommended for every website accessible on the Internet.
In general, SSL certificates are issued by a Certificate Authority, or CA for short. A CA is an organization that issues the certificate after verifying the person who applied for the certificate, depending on certain criteria.
SSL certificates have three different levels of validation that require different verification levels:
- Domain Validation (DV) – the person requesting the certificate only needs to prove their right to manage the domain.
- Organization Validation (OV) – the person requesting the certificate must prove two things. Firstly, the right to manage the domain name in question, and secondly, the fact that their organization actually exists as a legal entity.
- Extended Validation (EV) – the person applying for the certificate must prove to the Certificate Authority their organization’s legal identity in a more authoritative process that includes manual checks by a human.
So, that’s SSL certificates in a nutshell.
But you might still be wondering: why do I need one?
Why Is an SSL Certificate Important for Your WordPress site?
Firstly, having an SSL certificate increases the credibility of a website.
As mentioned briefly, the certificate contains information about the person or organization that owns the domain for which the certificate was issued. This information was verified by the CA before the certificate was issued and can therefore be trusted.
So when you go to an SSL-secured website, you can click on the padlock icon next to the URL field and view the details of the certificate.
This way, when you visit a WordPress website or blog that has an SSL certificate, you can verify the owner of the website and find out if you can trust that domain.
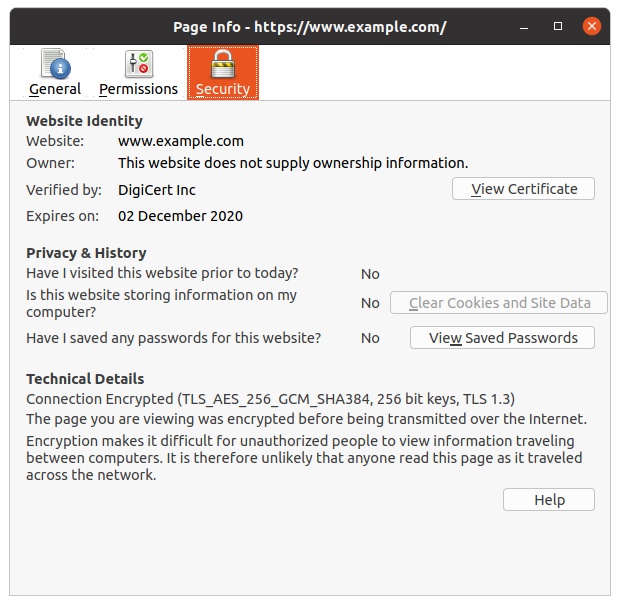
Secondly, an SSL certificate encrypts the data sent between your browser and the web server.
If you’re visiting an SSL-secured site, then your IP address, email address, username and password, and credit card details – are all encrypted and can’t be accessed by anyone with malicious intent.
If you’re visiting an SSL-secured site, then your IP address, email address, username and password, and credit card details – are all encrypted and can’t be accessed by anyone with malicious intent.
This is especially useful if you browse websites on public networks, such as the Wi-Fi at your favorite coffee shop.
In the early days of the Internet, SSL certificates were mainly used by websites that were legally required to secure the transferred data. For example, banks and financial institutions that stored sensitive customer data, or eCommerce websites that received credit card payments.
Today, however, an SSL certificate is recommended for every website accessible on the Internet. Most modern web browsers display a small warning Unsecure when you browse a website that doesn’t have a secure connection. And the major search engines like Google will even rank your site lower in search results if it doesn’t have an SSL secured connection.
So, do you want to make your website secure? And do you want your visitors to place their trust in your website?
If yes, then you should definitely get an SSL certificate for your WordPress site. And we’ll tell you all about getting one in the next section.
How Do I Get an SSL Certificate?
There are several different types of SSL certificates and the way you get one depends on the type you need. In general, however, installing an SSL certificate requires some knowledge of web servers and command lines. Usually, you need to be able to run OpenSSL commands so that you can generate the necessary files on the web server to obtain and install the SSL certificate.
However, there are other options available as well, depending on your specific requirements.
Without further ado, let’s take a look at the different ways of getting an SSL certificate. First, we’ll explain the various ways and then we’ll move on to a tutorial with all the necessary steps you’ll need to take to install the certificate.
Purchase a Certificate From a Certificate Authority
Firstly, you can easily purchase an SSL certificate – either DV, OV, or EV – directly from a CA. Companies like DigiCert, Thawte, and Comodo allow you to buy certificates and install them on your own.
You should keep in mind, though, that installing a pre-purchased SSL-certificate requires some technical knowledge.
You should keep in mind, though, that installing a purchased SSL-certificate requires some technical knowledge. You’ll need to create the necessary files on your web server, submit them to the CA, and then download and install the certificate on your server.
Create a Self-Signed Certificate
Secondly, you can create a self-signed SSL certificate on your own without involving an external CA – it’s an SSL certificate generated and validated by a web server itself. But you should keep in mind that the information in the certificate will only be validated by you and no external authority.
Mostly, this is not practical for a public-facing website. Web browsers can’t be sure about trusting the information in a self-signed certificate – or its level of encryption.
Web browsers can’t be sure about trusting the information in a self-signed certificate – or its level of encryption.
However, a self-signed certificate can be really useful for a staging or development version of your site that only a few people will visit.
Generate a Free SSL Certificate With Let’s Encrypt
Finally, you can get a certificate issued by Let’s Encrypt, which is a Certificate Authority that provides free, verified SSL certificates. The Internet Security Research Group launched it in 2014 to make obtaining verified SSL certificates easier. And also to create a more secure and privacy-respecting Web.
The certificates issued by Let’s Encrypt are domain-validated (DV) only. This means that the domain name of the applicant is validated by proving some control over the domain. Usually, it’s done by adding a DNS setting or uploading a specific file to the website.
While this type of SSL validation is perfect for your typical WordPress blog or website, it might not be suited for a site containing highly sensitive information. For such sites, buying OV or EV SSL certificates would be better and create more trust in your visitors.
Now that we’ve explained the different ways of getting an SSL certificate, let’s see how you can install them.
How Do I Install an SSL Certificate On My WordPress Website?
In this section, we’ll cover in detail the three ways of getting an SSL certificate:
- Buying one from a Certificate Authority,
- Creating a self-signed certificate, and
- Generating a Let’s Encrypt certificate.
But before we move on with the instructions for installing SSL on your WordPress site, one last note:
For the purposes of this article, we’ll be referencing commands for Debian-based or Linux-based Ubuntu servers. These are currently the most widely used web server operating systems and are officially recommended by WordPress.
You can find instructions for both Apache and NGINX below.
Let’s get started!
Before You Begin the Installation
Depending on the path you take (self-signed, purchased, or Let’s Encrypt) you’ll require different levels of knowledge and technical skills.
So, before you begin installing the SSL certificate, you’ll need:
1. Access to your server’s console.
The console is where you can run commands on the server, which you’ll use to install the SSL certificate.
Moreover, you’ll need to be able to either run these commands as the root user – or use the sudo command (there’s an example down below).
2. SSH access and an SSH client.
In addition to having access to the server’s console, you’ll likely need to be able to log in via SSH.
This is because WordPress.org officially recommends using either Apache or NGINX web server software for hosting WordPress sites. This, in turn, means that your hosting provider is most likely running a Linux/Unix based operating system.
And SSH access is the safest way to access the web server.
If you’ve never logged into a server’s console before, I recommend you check out this handy guide from WPMU DEV. However, it’s quite simple, if you have the right instructions.
To access your server’s console you’ll need to download and install the SSH client called PuTTY – if you’re using a Windows computer. And if you’re on a Mac or any Linux based machine, you can use the built-in terminal.
3. OpenSSL toolkit.
Besides the necessary Apache or NGINX-compatible software, you’ll need OpenSSL – a software toolkit for handling all your SSL tasks. If it’s not already installed, you can do so using your web server’s package manager and the following command:
sudo apt install opensslNow, you should be done with the necessary preparations. So, let’s see how to buy an SSL certificate from a CA.
Buying an SSL Certificate From a Certificate Authority
If you’re going to purchase an SSL certificate from a CA, you’ll first need to generate a Certificate Signing Request, or CSR. A CSR is a special encoded file that allows you to send your web server’s public key to the Certificate Authority. It will include information that the CA needs to verify you or your company and your domain name.
Many Certificate Authorities (like DigiCert) have an easy-to-use OpenSSL CSR Creation form. To show you how to buy an SSL certificate, we’ll look at DigiCert as an example and we’ll go through all the steps. If you like, you can use any other service and the steps shouldn’t be too different.
1. Fill Out the DigiCert’s OpenSSL CSR Wizard Form
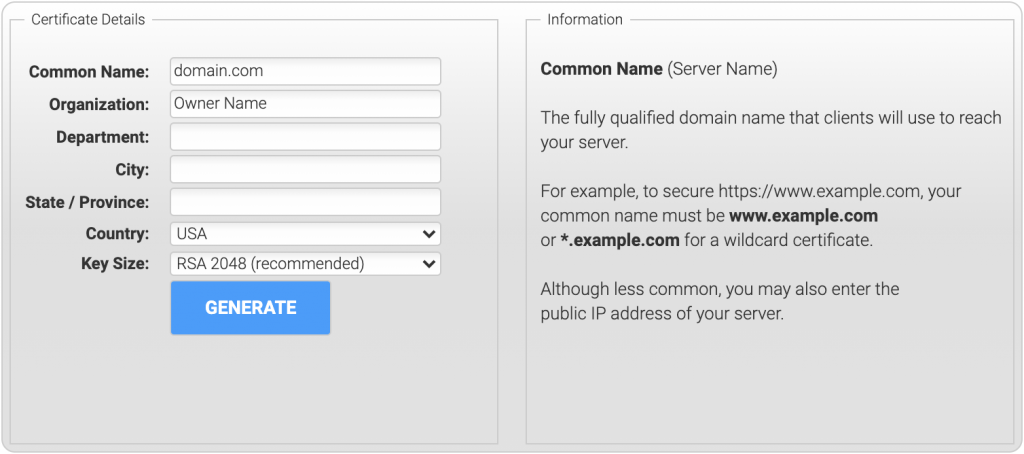
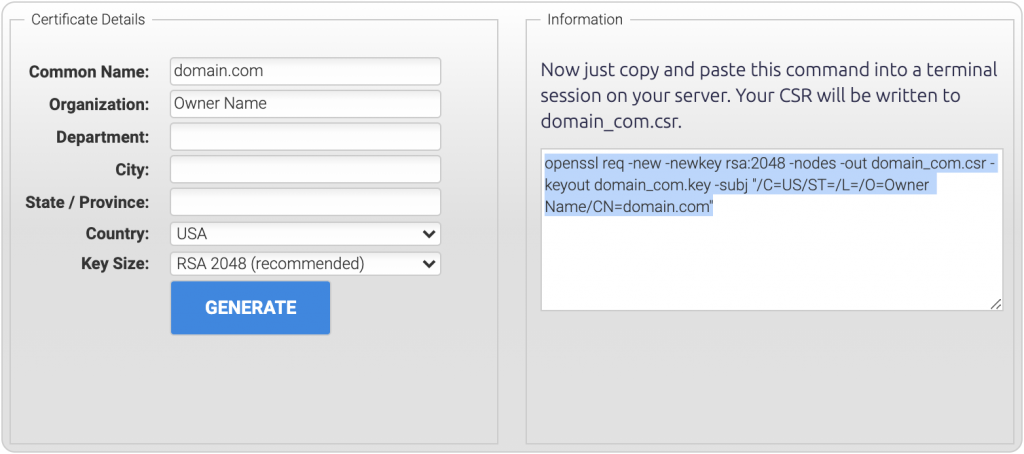
To create the CSR, go to the DigiCert’s OpenSSL CSR Wizard form and fill out the form. Then, click the Generate button, and it will output a command that you can run on the server to create the CSR file.
2. Create the CSR File Using Your Server Console
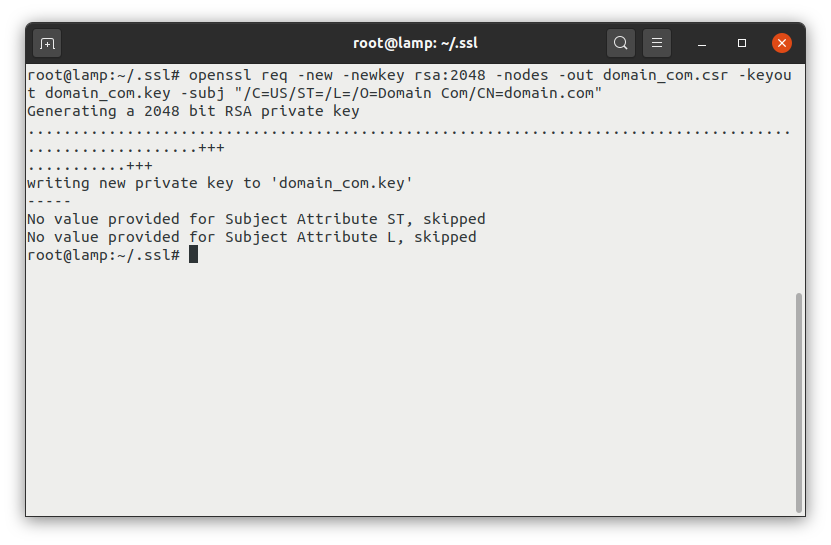
Copy the command from the right-hand side of the form and paste it into your server console. Now, this automatically-generated command doesn’t specify output directories. So, it’s a good idea to run it inside the directory where you want to store all your SSL certificate related files – then you can easily find them on the server later.
A good place to run the command in is the /etc/ssl/certs directory for certificate files, and the /etc/ssl/private directory for any .key
files.
The below command example will create the CSR file (in this case domain_com.csr) which then needs to be attached to the order form when you purchase your digital certificate.
sudo openssl req -new -newkey rsa:2048 -nodes -out /etc/ssl/certs/domain_com.csr -keyout /etc/ssl/private/domain_com.key -subj "/C=US/ST=/L=/O=Domain Com/CN=domain.com"You’ll notice this command also creates the public domain_com.key file, which you’ll need for installing the certificate.
3. Order the SSL Certificate
Your next step is to order the SSL certificate which involves uploading the previously created CSR file. First, go to DigiCert’s Order Form. There you can choose your preferred type of SSL certificate and its validity period.
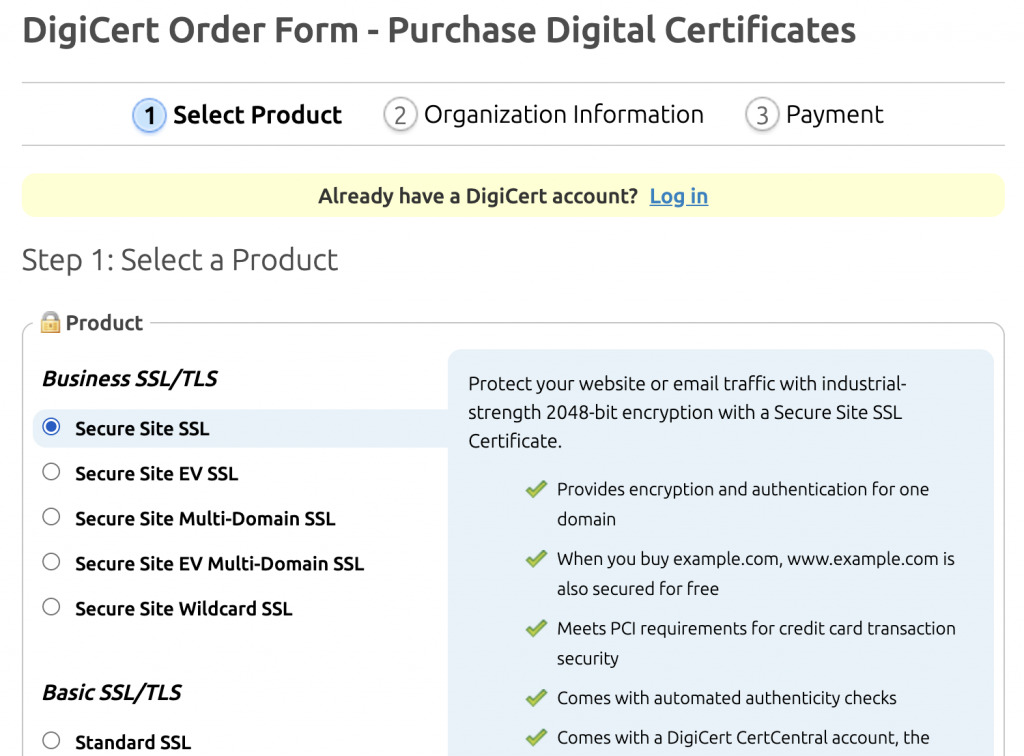
At the bottom of this page, there’s also a place where you can upload your CSR file.

Clicking on the I would like to provide my CSR and auto-fill names now option will open a pop-up window where you can paste the CSR file details.
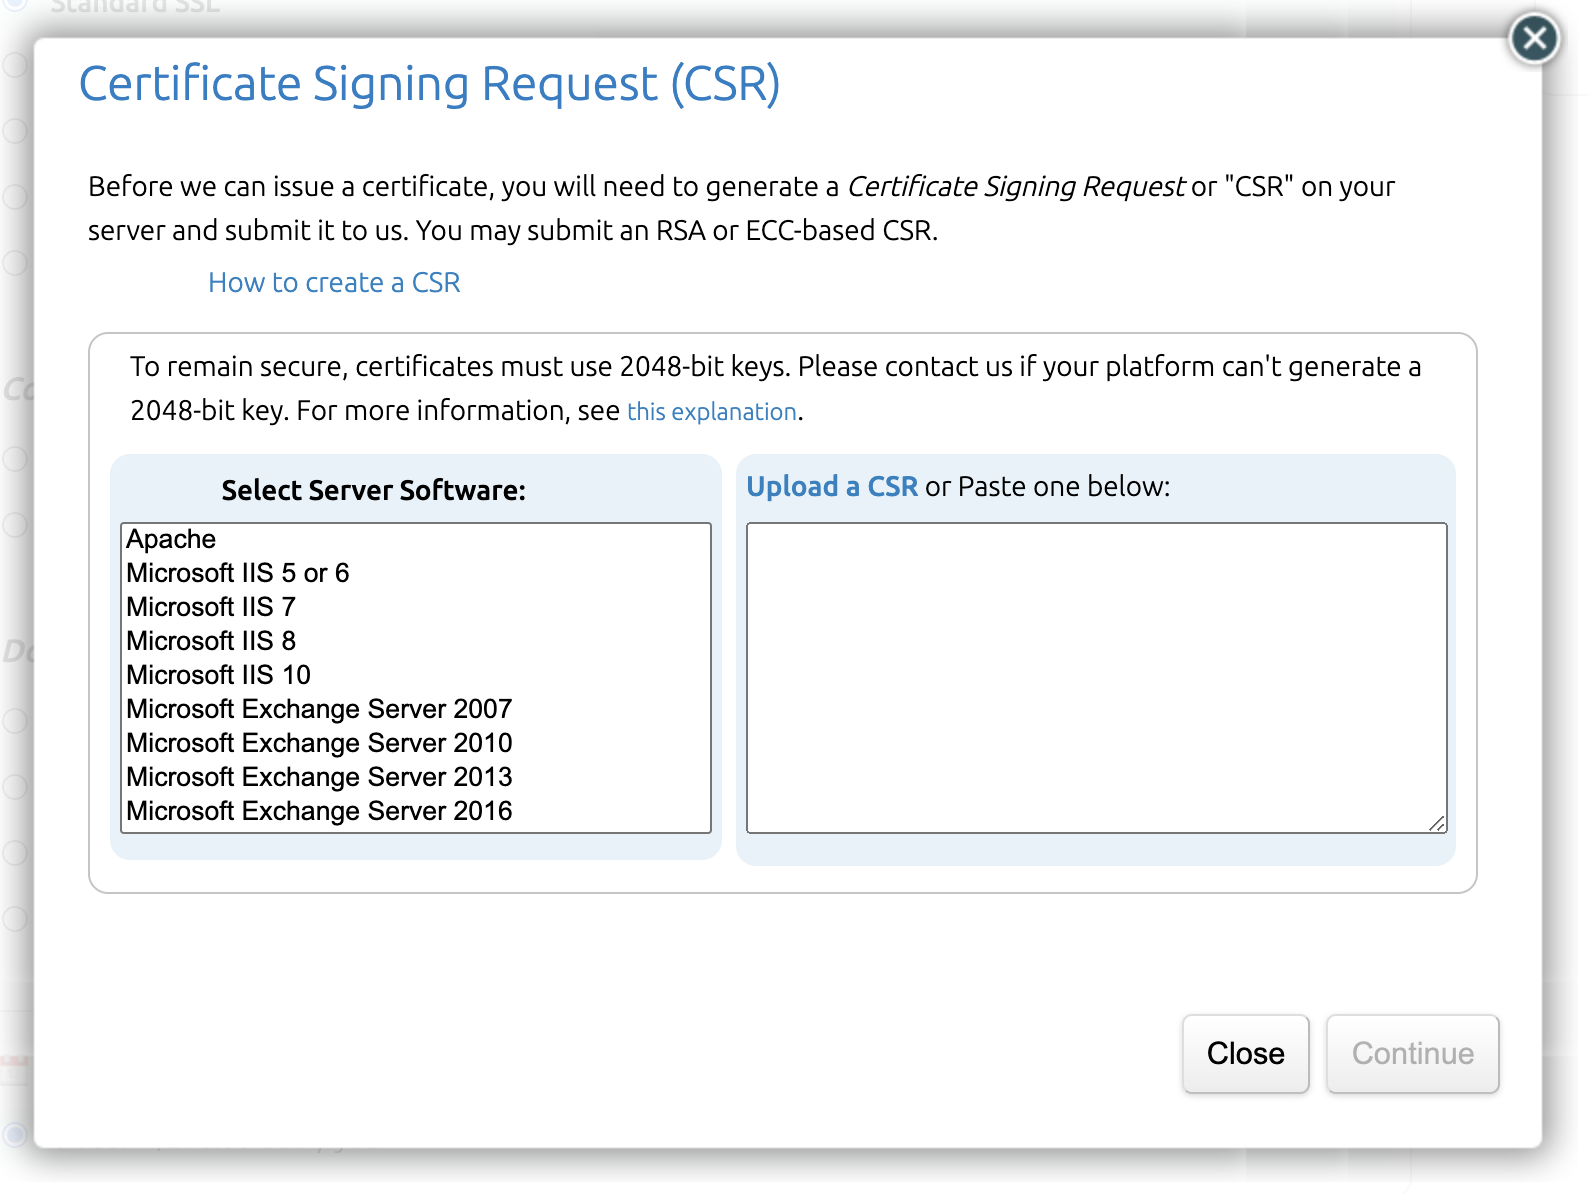
You will need to confirm your web server software, and to either upload the CSR or paste the contents of the file in the available text area. You can then click Continue to close the pop-up and go back to ordering.
Now, back on the Order Form you can click Continue. This will take you to the Organization Information page, where you have to enter all the relevant details for verifying your identity. You might need to enter the details for your technical contact if you’re not the person managing your server.
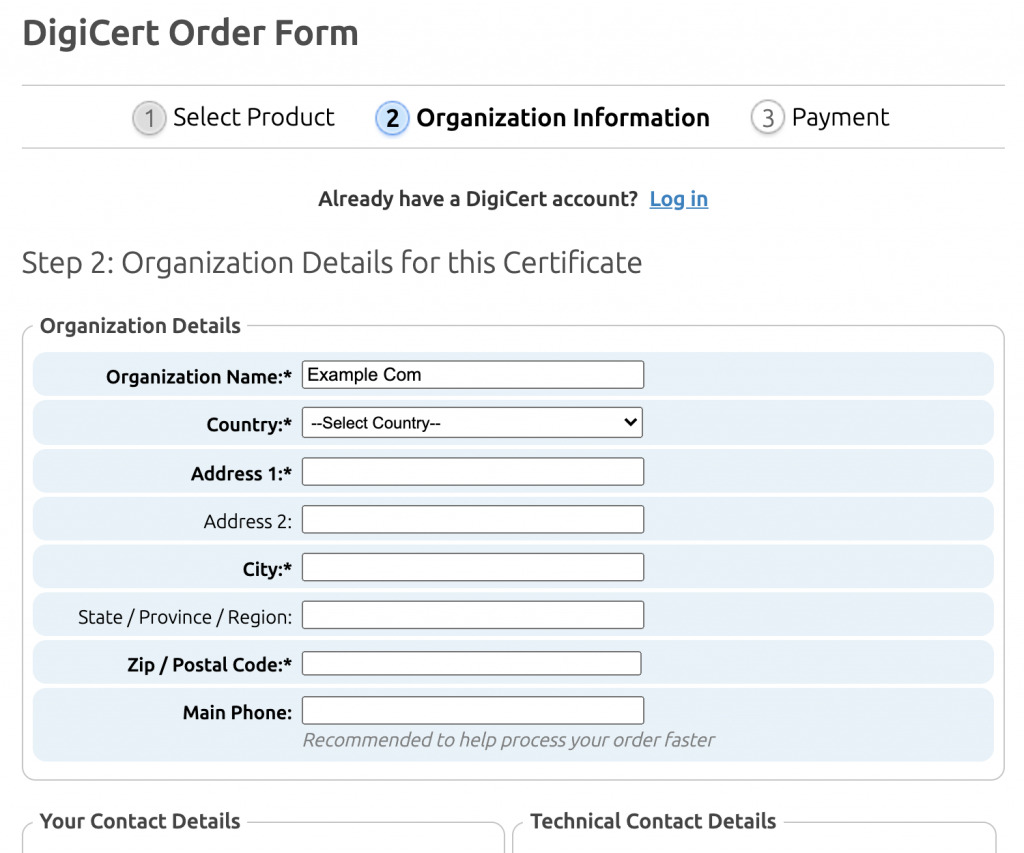
Clicking Continue on the Organization Information page will take you to the payment details page. There you can enter your billing information and confirm the SSL certificate order. DigiCert will also prompt you to create an account, so you can later access your certificate files when they have been issued.
Once you’ve placed your order, the CA validation team will attempt to validate the information in the CSR. If everything checks out, the CA will issue your chosen SSL certificate and you can move on to installing it.
Installing a CA-Issued SSL Certificate
When you install the SSL certificate on your server, you’ll first get an intermediate certificate along with your root certificate. This intermediate certificate establishes the chain of trust with your SSL certificate by tying it to your CA’s end-entity certificate. You’ll need to install and configure both of these certificate files on your web server.
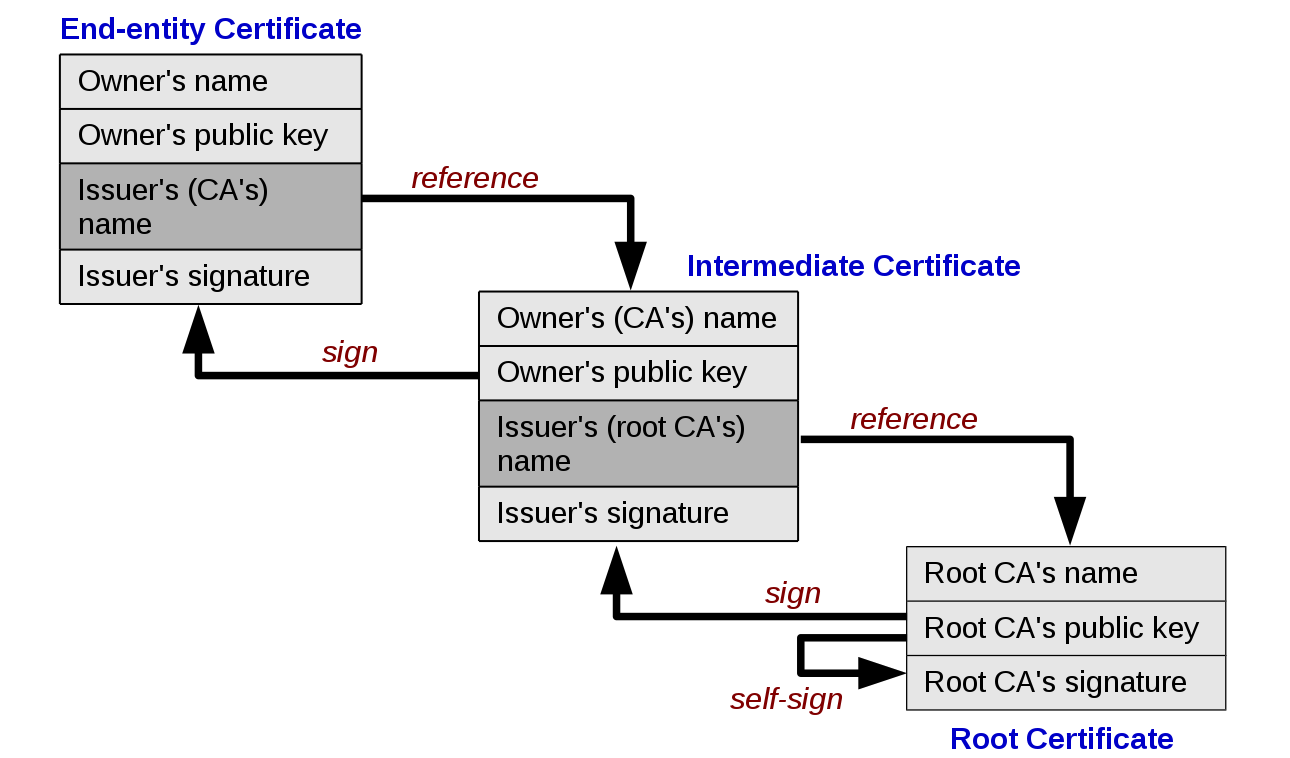
To get your certificate files, you’ll first need to log into your DigiCert account. Then, you can download the intermediate certificate and the root certificate and copy them to your web server – ideally in your /etc/ssl/certs directory. Finally, you’ll need to configure your web server software with the location of these files.
SSL Installation With Apache
If you’re using Apache, you’ll have to edit one of two files. Either the default virtual host file, if your web server is only hosting one site. Or the virtual host file specific to the domain you want to configure the certificate for.
By default these files are located in the following directory: /etc/apache2/sites-available/ and the default-ssl.conf file typically looks something like this:
<IfModule mod_ssl.c>
    <VirtualHost _default_:443>
        ServerAdmin webmaster@localhost
        DocumentRoot /var/www/html

        ErrorLog ${APACHE_LOG_DIR}/error.log
        CustomLog ${APACHE_LOG_DIR}/access.log combined

        SSLEngine on
        SSLCertificateFile  /etc/ssl/certs/ssl-cert-snakeoil.pem
        SSLCertificateKeyFile /etc/ssl/private/ssl-cert-snakeoil.key

        <FilesMatch ".(cgi|shtml|phtml|php)$">
          SSLOptions +StdEnvVars
        </FilesMatch>
        <Directory /usr/lib/cgi-bin>
          SSLOptions +StdEnvVars
        </Directory>

    </VirtualHost>
</IfModule>
You’ll need to update the file destinations for SSLCertificateFile, SSLCertificateKeyFile, as well as add a line for SSLCertificateChainFile so that they match the files you have copied to the server.
So, your default-ssl.conf file should look like this:
<VirtualHost _default_:443>

DocumentRoot /var/www/html

SSLEngine on
SSLCertificateFile /etc/ssl/certs/your_primary_cert.crt
SSLCertificateKeyFile /etc/ssl/private/your_private.key
SSLCertificateChainFile /etc/ssl/certs/the_intermediate_cert.crt

</VirtualHost>
Finally, you’ll need to enable the SSL virtual host and restart the apache server:
sudo nano a2ensite /etc/apache2/sites-available/default-ssl.conf

sudo service apache2 restart
And your SSL installation is complete. Now, let’s look at how to install the certificate with NGINX.
SSL Installation With NGINX
The setup and configuration for NGINX is more or less the same, but the main difference is in the configuration file itself. The virtual host files are located at /etc/nginx/sites-available/, and you’ll need to create an SSL virtual host with the relevant SSL certificate information.
The other main difference is that you’ll need to join the primary and intermediate certificates into a single .pem file. You can use this command:
sudo cat /etc/ssl/certs/your_primary_cert.crt /etc/ssl/certs/the_intermediate_cert.crt >> /etc/ssl/certs/bundled_crt.pemOnce you have done this, you can copy the default NGINX config to the default-ssl.conf file, and configure the SSL certificates:
server {
    listen 443 ssl;
    listen [::]:443 ssl;

    ssl    on;

    ssl_certificate    /etc/ssl/certs/bundled_crt.pem;

    ssl_certificate_key    /etc/ssl/private/your_domain_name.key;

    root           /path/to/your-domain/public_html;
    index          index.html;
    location / {
                try_files $uri $uri/ =404;
        }
}
And then, you’ll just need to restart the NGINX server:
sudo service nginx restartOnce the NGINX server has restarted, your certificate will be installed.
However, there are still a few steps you should take to ensure your site is as secure as an SSL certificate can make it. Namely, you should redirect your insecure HTTP traffic to the HTTPS version of your site.
Redirecting Your Traffic On the Web Server
As you saw in the examples above, we enabled SSL encryption on port 443 of the web server. But what happens if someone browses to the non-secure version of your website, which is by default port 80?
Well, they will still be able to see the content on your web server. But it won’t be verified or secured by the SSL certificate you just installed.
It’s a good idea to configure your web server to redirect all insecure traffic (HTTP traffic) to the secured port (HTTPS traffic)
So, it’s a good idea to configure your web server to redirect all insecure traffic (HTTP traffic) to the secured port (HTTPS traffic).
Let’s take a look at how to do that.
Configuring HTTP Traffic Redirection To HTTPS
Configuring traffic redirection on the web server requires the same console access we used to configure the SSL certificate. But in this case, the files we’re editing are the default virtual hosts files, for each web server type.
So, for Apache, the files are still located in the /etc/apache2/sites-available/ directory and the default virtual host file is named default.conf.
To enable redirection, you should update the default.conf file to look like this:
<VirtualHost *:80>
    ServerName yourdomain.com
    Redirect permanent / https://yourdomain.com/
</VirtualHost>
And then restart the Apache web server:
sudo service apache2 restartOn NGINX, the files are still located in the /etc/nginx/sites-available/ directory and the default virtual host file is named default.
To enable redirection, you should update the default file to look like this:
server {
    listen 80;
    server_name yourdomain.com;
    return 301 yourdomain.com$request_uri;
}
And then restart the NGINX server:
sudo service nginx restartIn both cases, you’re telling the web server to redirect any request to the domain on the non-secure port (port 80) to your SSL-secured domain port instead.
If you’re not fond of using command lines, you can install a plugin to do the work for you.
However, that’s not an ideal solution. Let’s see why.
Using WordPress Plugins To Redirect HTTP Traffic To HTTPS
As mentioned, there are WordPress plugins out there, that redirect the HTTP traffic for you. Some users find it to be an easier way for redirecting insecure traffic. Maybe they don’t have the knowledge or the experience in web server configurations to be able to redirect the traffic themselves.
The problem with HTTP-to-HTTPS plugins is that traffic redirection will only work at the software level.
But the problem with HTTP-to-HTTPS plugins is that traffic redirection will only work at the software level.
In other words, the PHP files in the plugin take the non-secure traffic and redirect it to the secure port, which will only affect the content served via PHP. So, the plugin won’t affect any external files like CSS, JavaScript, or media files. While this is not a huge problem, it can lead to insecure content warnings.
These warnings – also called mixed content errors – appear when the browser reports that while some content is secure, some of it is not. And this can affect your search engine rankings.
I therefore highly recommend that you redirect your traffic at the web server level, and not via a plugin.
With that, we’ve covered installing a CA-issued SSL certificate. Now, let’s move on to self-signed certificates.
Generating a Self-Signed Certificate
Do you manage your own web server, and you want to generate a self-signed certificate?
Then you’ll need the same console access and OpenSSL software as you would need if you were purchasing an SSL certificate from a CA.
As previously mentioned, though, this is not practical for a secure, public-facing website, as the certificate is not verified by a trusted external source. It is, however, perfect for a staging or development version of your site, which only a few people will need to visit.
To create the self-signed certificate keys, you can run the following command:
sudo openssl req -x509 -nodes -days 365 -newkey rsa:2048 -keyout /etc/ssl/private/selfsigned.key -out /etc/ssl/certs/selfsigned.crtThe console will prompt you to answer a series of questions and the answers will be included in the certificate. The most important of these fields is the Common Name (e.g. server FQDN or YOUR name) field. Here you should enter your website domain name or your IP address.
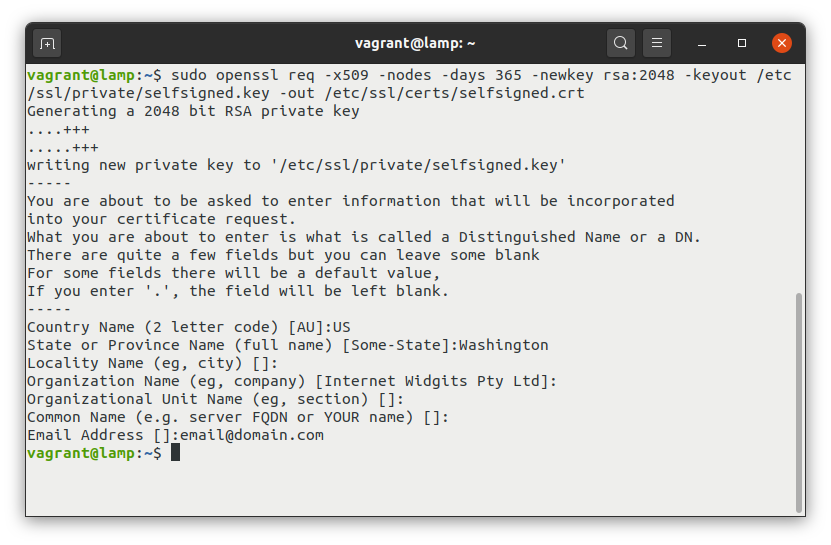
The two files that will be created are the key file /etc/ssl/private/selfsigned.key and the /etc/ssl/certs/selfsigned.crt certificate file.
Installing a Self-Signed Certificate with Apache and NGINX
Now that you have generated the certificate and key files, you’ll need to configure your web server software to use these files.
Let’s first take a look at how to do that with Apache:
As with a purchased certificate, you’ll need to update the default-ssl virtual hosts file. The file should look like this:
<VirtualHost default:443>
    ServerName your-domain.com
    DocumentRoot /path/to/your-domain/public_html

    SSLEngine on
    SSLCertificateFile  /etc/ssl/certs/selfsigned.crt
    SSLCertificateKeyFile /etc/ssl/private/selfsigned.key

</VirtualHost>
And that’s it!
On NGINX, you’ll need to create the default-ssl virtual hosts file and configure the relevant files again. After configuration, the file should look like this:
server {
    listen 443 ssl;
    listen [::]:443 ssl;

    ssl on;
    ssl_certificate /etc/ssl/certs/selfsigned.crt;
    ssltrustedcertificate /etc/ssl/certs/selfsigned.crt;
    sslcertificatekey /etc/ssl/private/selfsigned.key;

    root           /path/to/your-domain/public_html;
    index          index.html;
    location / {
                try_files $uri $uri/ =404;
        }
}
Generating a Let’s Encrypt Certificate
To create a Let’s Encrypt certificate you need the same console access as with other options, mainly to be able to install Certbot. This is a free, open-source software tool that allows you to create and manage a Let’s Encrypt certificate on your web server. Because Let’s Encrypt certificates expire after 90 days, Certbot also configures the certificate to automatically renew when it expires.
As each operating system will have a slightly different version of these steps, you might have to check the Certbot instructions page for details. Fortunately, they provide clear instructions for each popular web server and server operating system configuration.
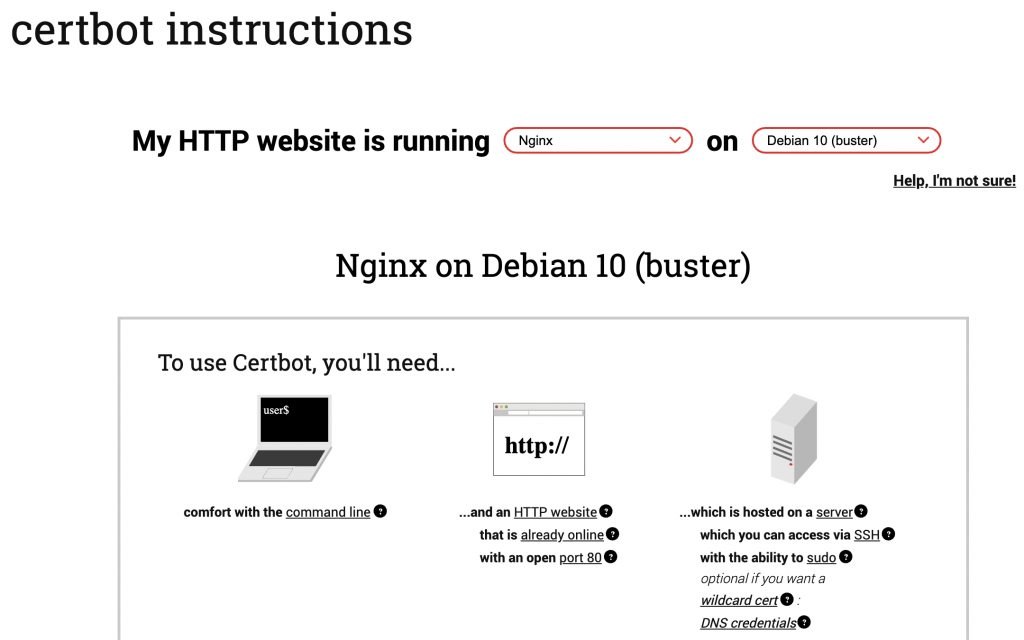
Below, we’ll show you the necessary steps for Nginx and Apache.
The first step is to install the Certbot software. On some older operating systems, you may need to add the Certbot repositories to install it. In that case, you can use these command lines:
sudo add-apt-repository ppa:certbot/certbot
sudo apt-get update
Then, you can install Certbot with a single command.
For Apache:
sudo apt install certbot python3-certbot-apacheAnd for NGINX:
sudo apt install certbot python3-certbot-nginxOnce installed, you can run another simple command to start the process of configuring your SSL certificate:
sudo certbot --apacheor
sudo certbot --nginxCertbot will then proceed to ask you a series of questions, like your email address and the domain name of the website in question. You’ll also have to confirm that you have read the terms of service that apply to the free certificates.
Then, Certbot will attempt to verify that your domain exists and whether you control it. It will also ask if you want to redirect regular HTTP traffic to HTTPS, which I do recommend, as explained above.
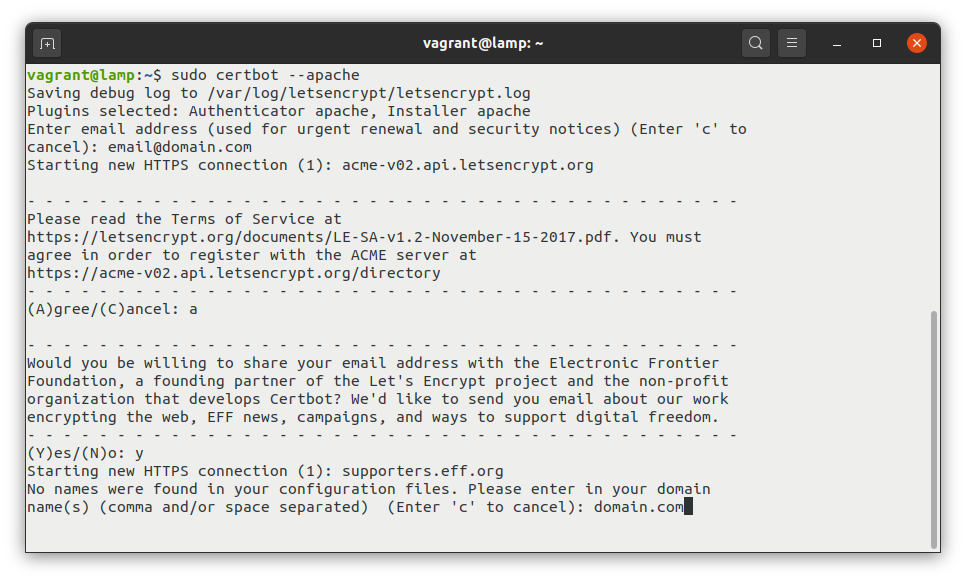
Once you complete this process, your certificate will be automatically installed and your web server will be configured to use the new certificate. Fortunately, you won’t need to make any web server configuration changes.
Automating SSL Installation for WordPress
Currently, full automation of installing SSL on your WordPress website isn’t something that the majority of hosting providers offer.
However, some service providers do have automated tools for purchasing the certificate from the CA and installing it for you. And most reputable web hosting companies have some options in your hosting control panel for managing SSL certificates.
Usually, they enable you to either generate a self-signed certificate or to generate the CSR and install the certificates issued from the CA.
More recently, many managed WordPress hosts have started offering an automated Let’s Encrypt service for a simple SSL installation. This means you can simply enable it on your WordPress site, and the service provider will run the commands to issue and auto-renew the SSL certificate for you.
To sum up, when choosing a web hosting service provider, it’s worth looking into whether you only need a domain validated certificate or not. If you do, a service that supports free Let’s Encrypt certificates and allows you to enable it automatically is a great time saver.
Implementing SSL On a WordPress Site Doesn’t Have To Be Difficult
In the past, installing and configuring an SSL certificate on your WordPress website might have seemed too technical for the general website owner.
You can understand why, given all the steps required to install one. Generating CSRs, purchasing the certificate from a CA, installing and configuring it on the server – all that can seem a bit overwhelming.
If your web host doesn’t offer at least a one-click Let’s Encrypt SSL option for your WordPress site, you might want to consider hosting somewhere else.
So, if you’re running an enterprise-level eCommerce store, or a site that processes a lot of financial transactions, it might make sense to pay someone to manage this for you.
However, most WordPress powered websites don’t need Fort Knox-level security with Extended Validation SSL certificates.
With the introduction of free CAs like Let’s Encrypt and tools like Certbot, hosting providers can automate generating and configuring an SSL certificate. And anything that they can automate, they can make available to end-users with a click of a button.
In fact, if your web host doesn’t offer at least a one-click Let’s Encrypt SSL option for your WordPress site, you might want to consider hosting somewhere else.
Conclusion
In this post, we covered what SSL certificates are, why they are necessary, and how you can get one.
To sum up, it’s important to secure the traffic of your site to protect your data as well as the data of your visitors. However, getting an SSL certificate or, in other words, directing your HTTP traffic to HTTPS, isn’t the only way to keep your site secure.
So, I recommend you start with an SSL certificate if you don’t already have one. But don’t stop there. There’s always something you can do to make your site even more secure.
Do you have any questions?
Feel free to post all your questions, ideas, and security tips in the comments below.
And make sure you follow the Pressjitsu Blog – many great tips on security will start appearing here.
Pressjitsu is a premium managed WordPress hosting service that really cares for you and your sites’ performance. Security is a top priority for us, so if you sign up, you’ll get free SSL certificates for all your sites.
We really hope that you’ll be part of Pressjitsu’s journey into the future, to beyond what we are today. We invite you to join us, either by trying us out or by following us on Twitter. You can also keep an eye on our blog to keep yourself up to date with our latest developments and recommendations for optimizing WordPress.
Перевод: https://pressjitsu.com/blog/implement-ssl-wordpress-step-step-tutorial/